As a computer user, you may be facing problems at least once in a while and your screen displays the “BOOTMGR is missing” error on startup or maybe your Windows goes into a blue screen or has auto system restarts loop on its startup process.
These are the sort of problems that are fixed by using the Windows utility tool called Windows startup repair.
StartUp Repair – What is it and How to Use it?
Table of Contents
Now, those of you who are uninitiated in this area might be wondering:
What is this “Windows Startup Repair” Utility after All?
Startup Repair is a Windows Recovery Utility named differently according to the Windows Version:
- Startup Repair: Windows 7, Vista
- Automatic Repair: Windows 8, 8.1
- Reset: Windows 10
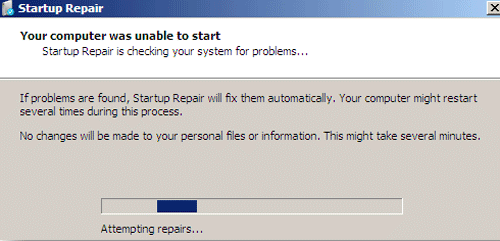
Startup Repair tries to automatically repair computers that are unbootable because of a number of reasons. For instance, it repairs your windows when something prevents your Windows from starting or putting in technical terms it restores boot volume files when your operating system is having difficulty in booting itself.
What are the Issues that “Startup Repair” can Fix?
Although Startup Repair is a useful and effective tool, it can repair only certain glitches. Some of these are mentioned below:
- Your Registry becomes corrupted.
- There are missing or damaged system and driver files.
- You are experiencing Disk metadata corruption (MBR, partition table, and boot sector).
- There is any File system metadata corruption.
- You are facing installing issues or the drivers are incompatible.
- Installation of Windows service packs and patches are coming back with incompatible errors.
- Your boot configuration data is corrupt.
- Startup Repair can detect bad memory and hard disk.
What are the Issues that “Startup Repair” Cannot help with?
Windows Startup Repair can only fix some issues. For the problems it cannot fix, it displays a message – startup repair cannot repair this computer automatically or automatic repair could not repair your PC.
It cannot fix hardware failures, such as failing hard disks or incompatible memory. Startup Repair is not a backup tool, it cannot help you recover any personal files (viz. photos or documents).
The windows error recovery cannot repair unbootable systems caused by any of the following issues:
- Any malfunctioning firmware and other hardware components.
- Any problems with clean Windows installations or Windows upgrades.
- Windows login errors.
- Viruses and malicious software.
How to Use Startup Repair?
You can access the Windows startup repair from the built-in Windows recovery, recovery media, or a Windows installation disc.
We will discuss each of the three approaches mentioned above separately.
Launch Startup Repair from the Windows Boot Menu
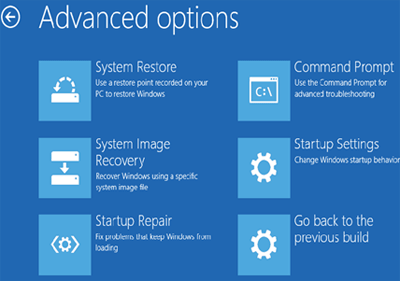
In Windows 8 or 10 you will see the advanced boot options menu if Windows cannot boot properly. You can go to Startup Repair by clicking Troubleshoot > Advanced Options > Startup Repair on this menu.
Windows will ask you for your password and try to automatically repair your system.
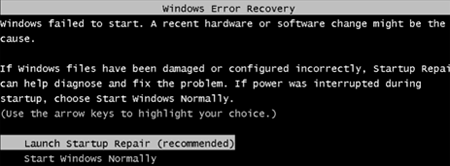
In Windows 7 you will see the Windows Error Recovery screen if Windows cannot boot properly. Choose “Launch Startup repair (Recommended)” on this screen to run startup repair.
Windows will ask for the username and password for your PC. After it does, select the “Launch Startup Repair (recommended)” option. Windows will try to find and fix problems that can prevent your PC from booting.
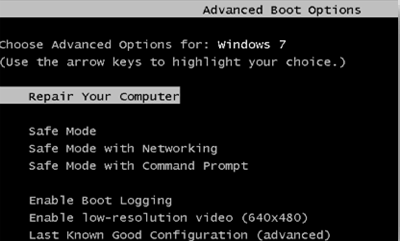
If Windows 7 won’t boot properly and doesn’t show you the Error Recovery screen, you can get into it manually. First, power the computer completely down. Next, turn it on and keep pressing the F8 key as it boots. You’ll see the Advanced Boot Options screen, which is where you would launch Safe Mode from. Select “Repair Your Computer” and run startup repair.
Launch Startup Repair From a Recovery Drive or System Repair Disc
If Windows is not booting properly and does not allow you to use the startup repair option at boot, you can initiate startup repair from a recovery drive or system repair disc.
If you have not already created a recovery drive, you can do so from another computer running the same version of Windows and use it to solve the problem.
Windows 7 only lets you create a recovery disc by burning a CD or DVD. Windows 8 and 10 allow you to create a USB recovery drive or burn a recovery disc as per your preference.
After creating the recovery drive, insert it into the PC that is not booting properly and boot from the disc or USB drive. You will be prompted to choose an installed version of Windows. Select “Startup Repair” to run a startup repair operation.
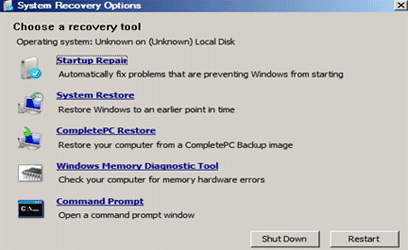
Launch Startup Repair from Windows Installation Media
Startup Repair can also be run from a Windows installation disc or USB drive.
If you do not have Windows installation media, you can download a Windows 7, 8, or 10 from Microsoft and either burn it to disc or copy it to a USB drive.
Make sure that you use the media that matches the version of Windows you are trying to recover, for instance, you will use a Windows 10 installation media for a Windows 10 PC or Windows 7 installation media for a Windows 7 PC.
Insert the disc or USB drive into the system that is having booting issues and boot from the device.
In Windows 8 or 10, click the “Repair your computer” option instead of “Install now” on the installer screen. Then choose Troubleshoot > Startup Repair to run startup repair.
Final Thoughts: Windows Startup Repair
The startup repair is a very effective utility provided by Windows. However, this tool is not a solution for every problem as discussed earlier.
We hope you found these tips helpful. Do share your experiences in the comments below.
Related Guides and Lists:


George
Well written article. Detailed and straight to the point. Thanks for the information.
N Alam Sajib
Very informative article and huge information here how to recover windows. It’s a major problem for the user. Your information is very very helpful for the new user and who are don’t know about windows like me.
A.R.
Will startup repair have any effect on my documents such as deleting them? Or will my files be okay?
Brian
Great guide on Windows StartUp Repair! Clear steps and helpful tips for getting your PC back on track.