As technology advances every day, it decreases our dependency on manual, analog systems. But as we gradually transition towards a fully automated, AI-centric world where every time is available to us at a push of a button, companies building these systems need to make sure that these systems scale gracefully and are robust.
This is where Linux comes into the picture. For the average user, it sure looks like computing is dominated by Windows or macOS or Android and iOS. Still, it’s safe to say that most “non-Microsoft” products and services (and some of their own infrastructure) rely on heavily and is built upon the industrial strength of Linux.
Since most of our currently used services rely so heavily on Linux, it only makes sense that you, as a tech enthusiast, have a working knowledge of the OS and its key components. The reason being, should a need for troubleshooting arise, you rely on your muscle memory instead of trying to figure it out. You get frustrated at the time of the issue (and trust me, there’s going to be a fair bit of frustration involved at least in the first couple of days).
Now, I’m pretty sure that if you’ve come to this article, you have a fair bit of understanding of what Linux is and where it’s roots are. If not, however, you can read our posts Introduction to Linux Operating System and Introduction to Linux Kernel, which should give you a brief idea of Linux.
This series is going to be a completely hands-on one, and you will be required to follow along on your machine. We’ve structured the post in such a manner that it is extensively detailed while not becoming too overwhelming for beginners. Consider this series to be like the “Linux for Dummies” equivalent, with the difference being that instead of throwing in all of the knowledge at once. We will divide into smaller meaningful chunks. Unlike most of the posts we do, I would suggest you get ready for doing some work (after all, the best way to learn Linux would be to get your hands dirty with its nuances). Before we even begin all of that, let me give you a quick little primer on Linux and clear out some of the misconceptions about how Linux is completely different from Unix. It won’t be too long, I promise.
Linux Fundamentals: How is it Different from Unix?
1. Inception
- Unix: Unix was built in 1969 at Bell Labs. One of the most recognized founding members was Dennis Ritchie. It was written in C and was designed as a portable operating system that is capable of multi-tasking.
- Linux: Linux was built by Linux Torvalds and is heavily inspired by MINIX (a Unix-like distribution). It derives a lot of things from Unix but is a completely different system both inside and out. The original kernel was released in 1991 and after adding things like drivers and a GUI and some much-needed polish, the full-fledged OS was released in 1992.
2. Development
- Unix: Unix is not necessarily a fully open-sourced project. Parts of it are, but in its ethos, it is a proprietary system. There are several versions of Unix, like BSD, macOS, etc. The initial development is done by AT&T and a couple of other commercial vendors.
- Linux: Unlike Unix, Linux thrives in an open-source ecosystem. The entire project is actively funded and monitored by the Linux Foundation. The development is still supervised by Linus, who makes the final call on a new addition. But essentially anyone with a programming background can download the source code freely and make modifications.
3. Architecture
- Unix: Unix was designed to be used on RISC systems and Iranium machines, but as per needs, it was later ported to work on x86 and x64 architectures as well.
- Linux: Linux was primarily built for Intel’s x86 architecture, but as of today, it supports almost all major platforms, which include ARM, ARM64, etc., thanks to its active development community.
4. Command Line Interface
- Unix: Started off with support for the Bourne Shell. Now supports Korn and C Shell as well.
- Linux: Linux primarily used BASH (Bourne Again Shell).
5. Price
- Unix: Some distributions are free with paid support (like Solaris); others are completely paid.
- Linux: For the most part, free (not accounting the enterprise versions with priority support, etc.).
Alright, now that we’ve set the grounds on what Linux is and how it is different from Unix. Let’s get our hands dirty, shall we?
Setting Up the Environment: How to Install Linux on a Virtual Machine?
Since we’re trying to target a broad audience with this post, and there’s no requirement for any prior experience with Linux to get started here, I’m going to make things as easy as possible so that you can get on board quickly. As we progress through the series, we will make the complexity of the post incrementally higher so that you feel you get to learn something new with each passing week. At the same time, the decision to make this a weekly series instead of something released all at once was made. So, you get enough time to play around and try things out on your without any supervision. The best way to learn something is to break it yourself and build it back up.
For learning how to use Linux, you must first get Linux running on your system. There are several ways in which you can do so, some of them would be using a Live USB and booting into it, installing it physically on your machine, creating a multi-boot system with two operating systems, installing it on a VM (Virtual Machine), and renting a Linux server and SSHing into it. I’m sure the experts would expand this list with a bunch of more options, but for the sake of brevity, let’s go with the above. While the end result of using all of the above setups would be gaining access to a console to issue Linux commands, the steps to get there varies with each one in number and difficulty.
As this is a pilot post, we’ll go with probably the easiest one out there which won’t break your machine or current operating system in any way and one which does not require experience with advanced operations like partitioning a hard drive or configuring a remote server. Agreed, they are cool, but I promise we’ll cover that once you’re familiar with the basics.
My only assumption moving forward here on would be the following.
- You own a decent computer (4 – 8 GB RAM, a relatively recent processor like Intel Core i3 at least, 30 GB free space on the SSD/HDD at the very least).
- You are connected to a decent internet connection (you would need that to download a couple of things).
- You know the basic things like installing an application program on Windows or macOS (depending on what you use).
If you can tick all the above, you’re definitely in the league. Alright, to get started we’re gonna need a couple of things (quite literally).
- A Linux distribution (we’ll use Ubuntu here).
- A Hypervisor (the application that lets us install a secondary OS on top of our main OS), we will use Virtual Box.
Excellent now that all formalities are over, let’s get started with the fun stuff!
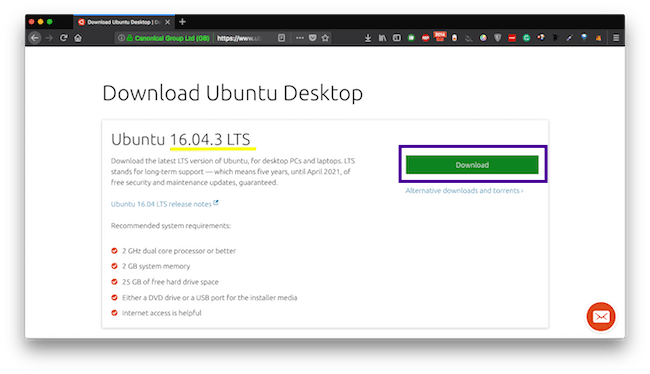
Step 1: Head over to the Ubuntu website and download Ubuntu 16.04.x LTS (we are using this just for stability reasons, so you don’t get any unnecessary errors along the way).
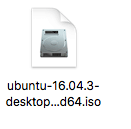
Once you are done with the download you should have a .iso file on your system. This is what it would look like.
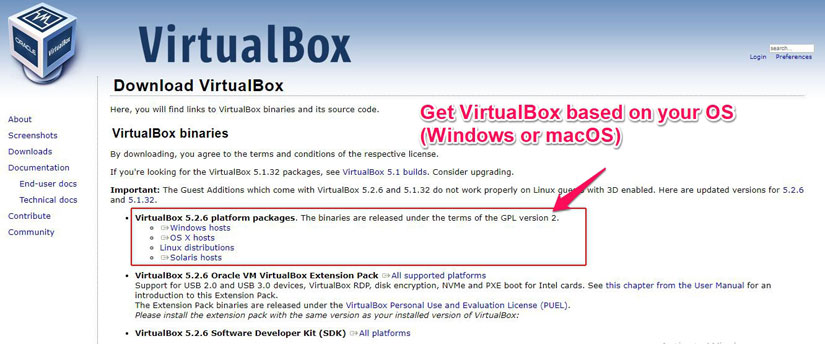
Step 2: Now, head over to the VirtualBox downloads page and download the VirtualBox 5.x platform package based on what OS you are currently using. If you are using Windows, for example, get the first one, which says Windows hosts.
Step 3: Now that you have both of the required files, just go ahead and install VirtualBox. Just double-tap on the .exe or .dmg file that was downloaded and follow the on-screen instructions. Make sure not to do anything custom there, just accept the defaults and complete the installation.
Once done, go ahead and launch VirtualBox. Your screen should look almost similar to mine as shown below minus the list of VMs that I have (since I already have been using Virtual Box, I have a couple of VMs set up, your list would be empty though).
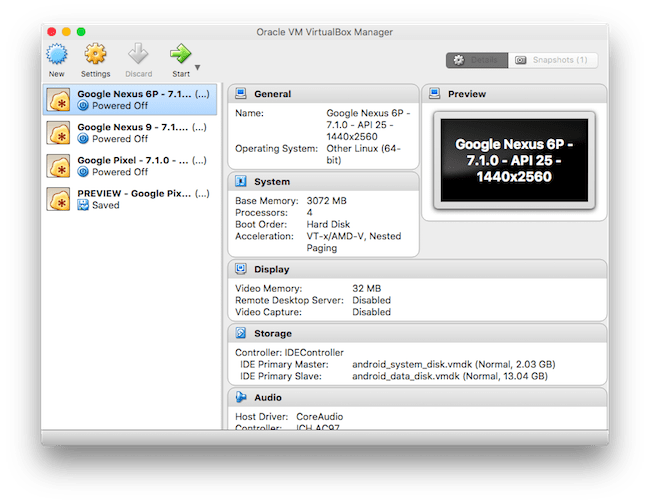
Step 4: We will now go ahead and start installing Ubuntu via VirtualBox. Click New on the top left of the VirtualBox window. You would get a dialog box asking to name the operating system. Type in Ubuntu in the Name, select Type as Linux and Version as Ubuntu (64-Bit) and hit Continue (newer versions of Virtual Box will automatically populate the Type and Version field based on what you typed in the Name field).
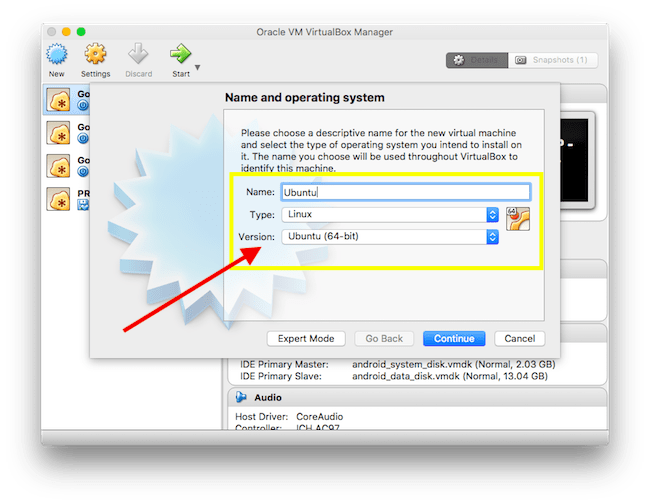
Step 5: Now, you’ll be asked to specify the amount of RAM that this guest OS (Ubuntu) will use; the default is 1GB, which is good enough, so let it remain there and click on Continue.
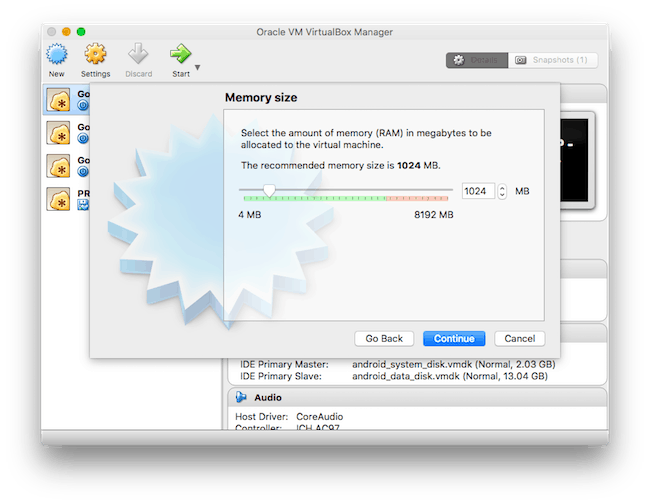
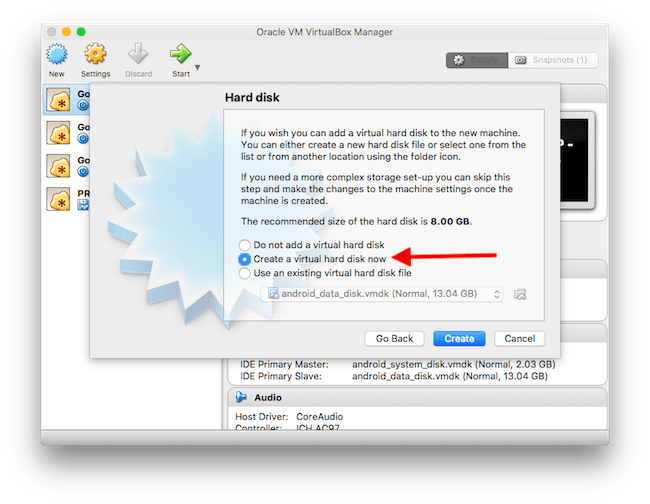
Step 6: Here, you need to specify the Hard Disk that will be used by the operating system. Often, people upload pre-configured installations of their virtual box instances in the form of something known as appliances. Appliances work in a plug and play manner.
So you can download the appliances, plug it into the virtual box instance, and you’ll have a fully functioning operating system without any setup. (Think of it like having two hard drives with two operating systems and just switching them out minus the hassle of unscrewing your PC up for this).
Just select Create a virtual hard disk now and proceed.
Step 7: Here, specify the type as VDI, which should be the default option and click Continue.
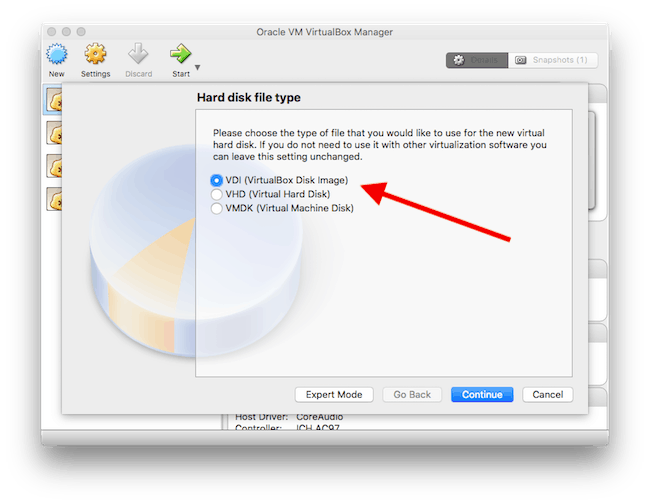
Step 8: Now select the size. It’s advised to have a dynamically allocated drive because it scales according to your needs compared to the fixed-sized option, which will assign the entire amount at once irrespective of the fact that you would need it or not.

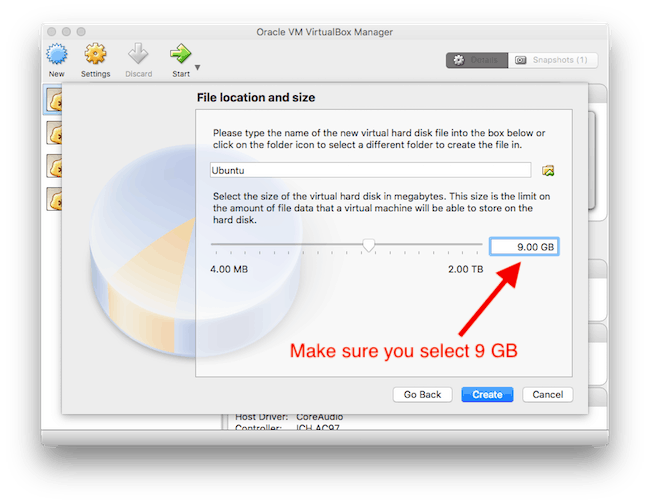
Now select the size of the hard drive; this will make sure that the hard drive never exceeds the specified amount. The default is eight, but make sure you select 9 GB to be on the safe side.
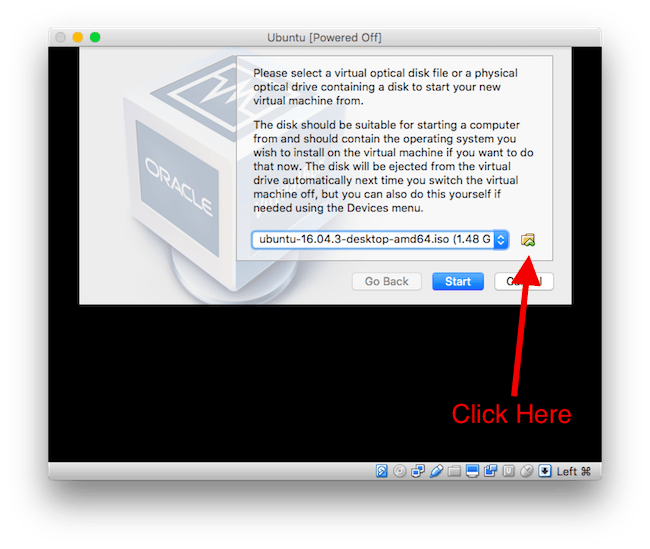
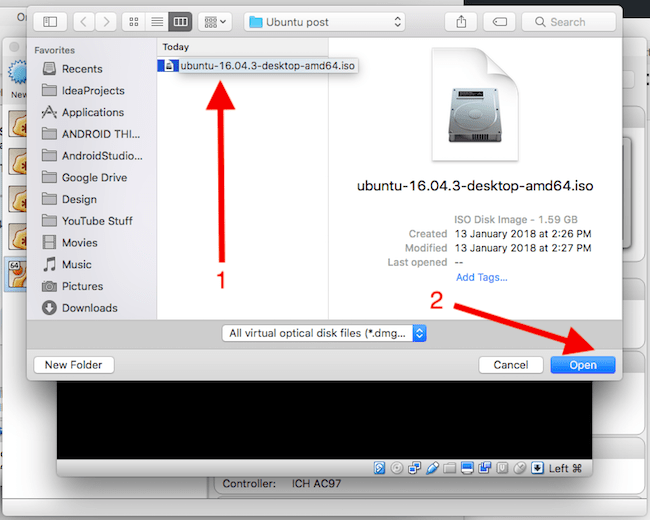
Now that we have done the setup let’s power up our machine. Select Ubuntu from the list on the left and click on Start on the menu bar of the VirtualBox window. Immediately a dialog will pop up, asking you to insert the image to boot Ubuntu from. This is where the Ubuntu image that we downloaded earlier will be needed. Click on the folder button (shown in the image below) in the dialog and navigate and select the Ubuntu image and click Open. Once that’s the image shown in the drop-down, click Start.
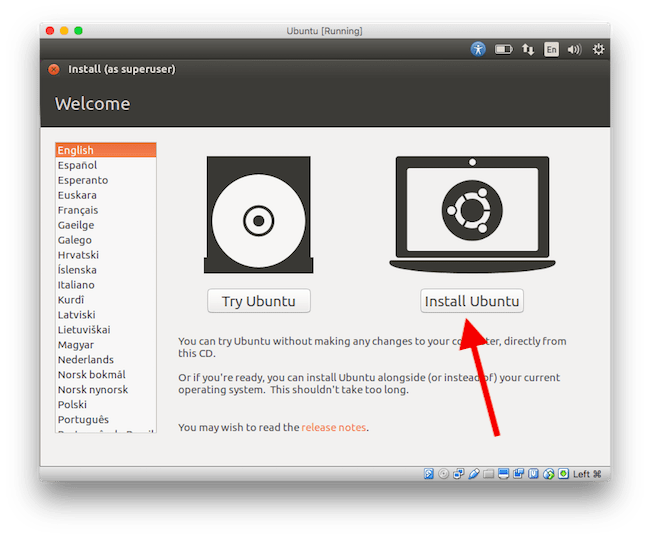
In a couple of seconds, you would be greeted with the Ubuntu installation options, as shown below. We can go ahead and “Try Ubuntu” without installing or install it. Let’s do the latter and click on Install Ubuntu.
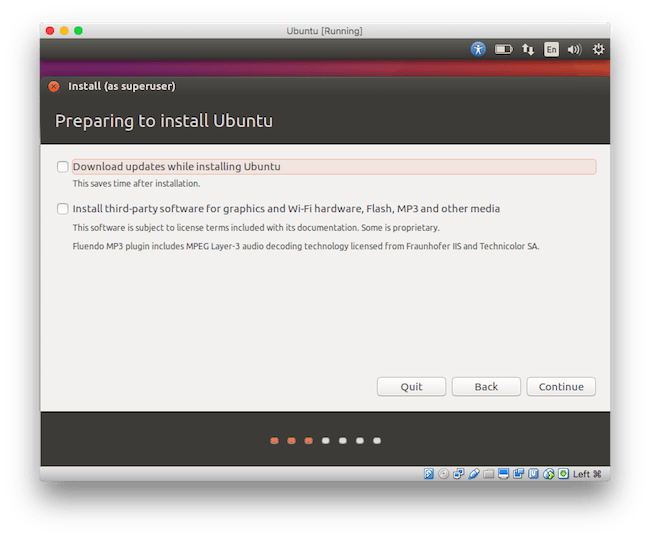
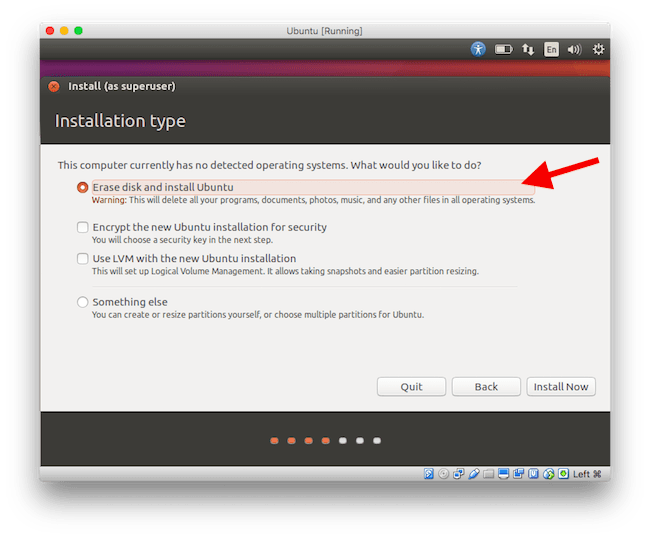
Again we’ll accept the defaults and proceed. Uncheck the download updates while installing options and the Install third-party software options and click Continue. Next, check the Erase disk and install Ubuntu option and click Install Now.
A dialog box will appear, asking you to confirm the erase process, click on Continue.
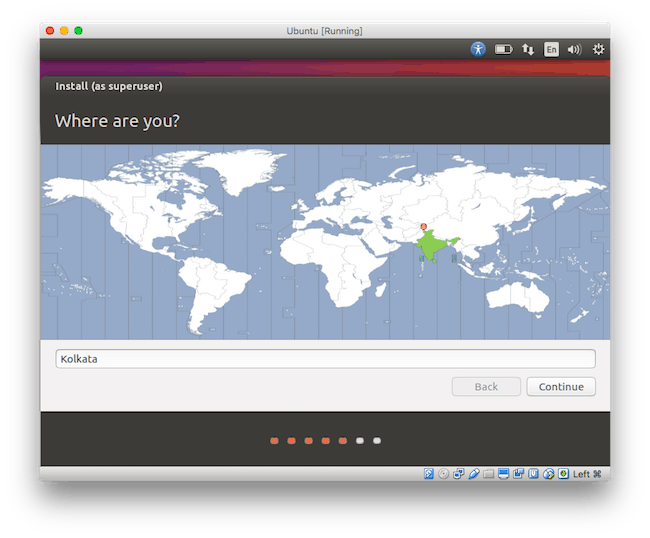
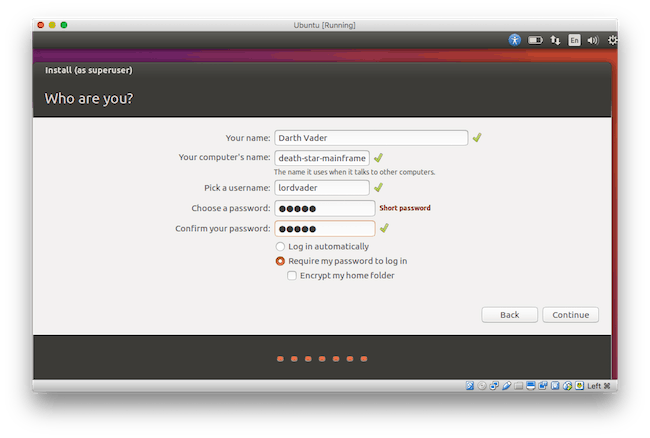
Select your location in this step and click Continue. Next, select your keyboard layout. And as usual, click Continue. Next up, specify your name, username, and the likes in fields.
And now you wait. Get yourself a coffee. It’s going to be a while till this is done.
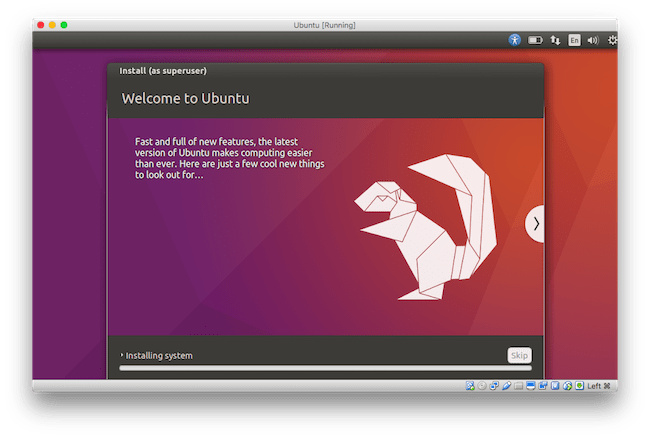
Once the installation is complete, you will be asked to Restart, go ahead and do that, and once that is done, you will be greeted by a login screen for Ubuntu. Just enter the password, and there you go, you have successfully set up your Ubuntu installation.
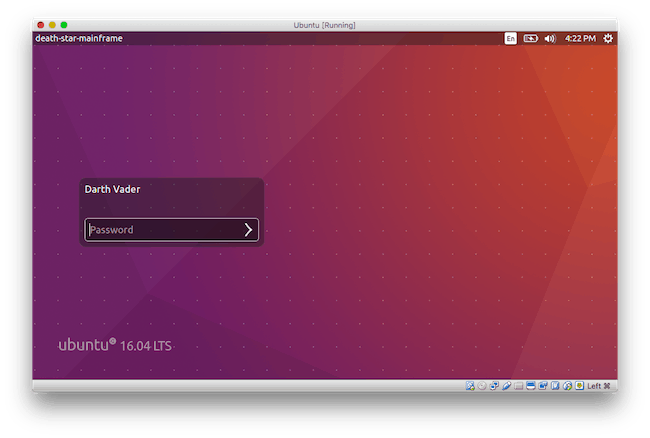
Pat yourself on the back. Now that we are ready with a Linux distribution installed, we are going to go over some of the basic Linux commands.
The Basic Linux Commands
Launch the terminal on Ubuntu as follows:

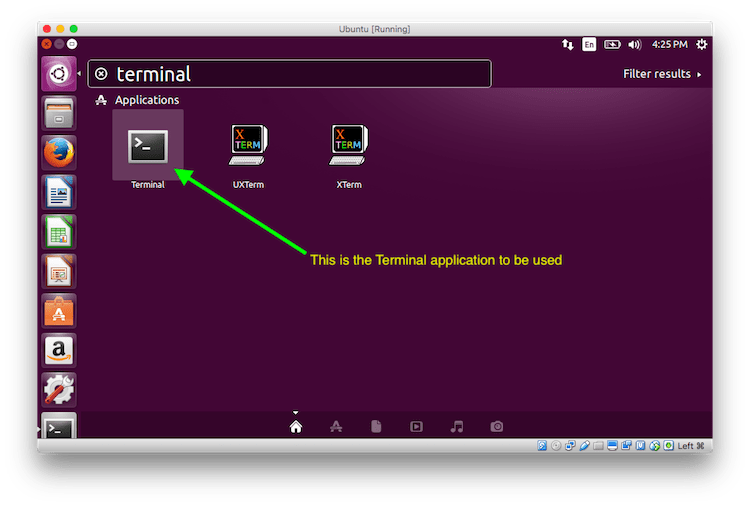
Once launched, it should look like this.

Alright, we are ready to start, just so you know, the proceeding screenshots will not look like the Ubuntu terminal because for increased visibility, I will be using a Linux terminal on my server. Don’t worry about that; just focus on the commands and see if you get the same results as I do in the screenshots.
Since this is the very first post in our hands-on series, we will limit ourselves to the very basics of Linux commands so that you are not overwhelmed, while still making sure that your interest doesn’t fall and you quit. The commands we will cover in this post will be divided into five different categories; they are as follows.
- Date and Time
- Navigating the filesystem
- Creating directories/folders and removing them
- Creating and deleting files
- Finding help
But before going through that, let’s do a ceremonial “Hello World” test for our terminal, shall we? Alright, then type in the following command in the terminal.
echo "Hello World"
Once you hit the enter key, your terminal would display the Hello World greeting. This not only kicks off our list of commands but is also a good test of checking if everything is working as expected. The echo command will display a line of text that is specified after the commands. The quotation marks are optional, but a convention is to use it with quotes.

1. Date and Time
Let’s start with a very basic command that is to check the date and time via the terminal. Aptly named date, the command displays the date and the current time in the 24-hour format along with your timezone. Please type in the following in your terminal to check it for yourself.
date

2. Navigating the filesystem
An essential thing that we, as users, do on an OS is moving around from one folder to another. So let’s learn how to do that on the terminal using a set of commands meant for that purpose.
- pwd – Before we start jumping around from one folder to another, let us learn how to find out which folder we are currently in. You can do that using the pwd command. It stands for Print Working Directory. Just type in the command as follows and check out the result.
pwd
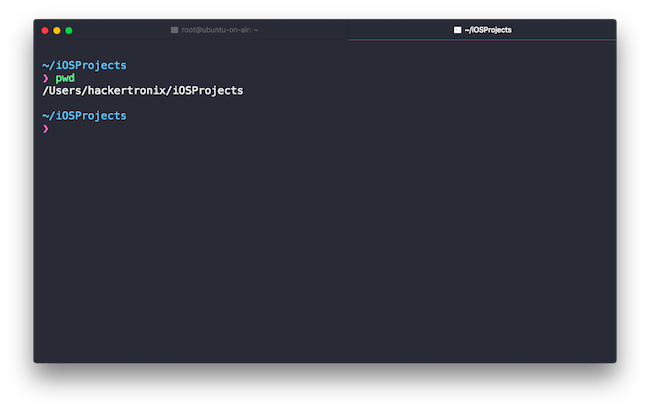
- ls – The ls command is basically used to list all the contents i.e. files and folders in a given directory. Just type the following in your terminal and it will list out everything that’s there in your current directory.
ls

By default, ls will only list out the filenames, to get details about every file you can use the -l option along with ls as follows.
ls -l
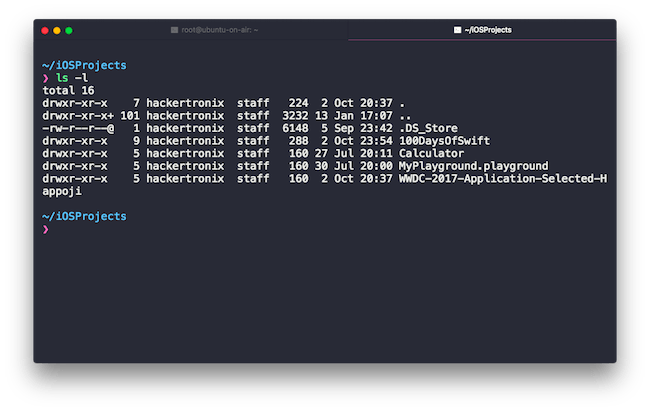
As you can see, this option along with ls has printed a bunch more information on each file which includes file mode, number of links, owner name, group name, number of bytes in the file, abbreviated month, the day-of-month file was last modified, hour file last modified, minute file last modified, and the pathname. I know most of it may not make sense right now, but don’t worry. All you need to know right now is that every command comes with a bunch of options you can plug in, to fine-tune the results returned.
- cd – Now that we are familiar with how to list files and check our current directory, let’s go over how to switch between directories. The command cd stands for Change Directory and is used as follows. If you are inside a directory and have more directories inside it, you can go into a sub-directory as follows.
cd NAME_OF_DIRECTORY
Replace NAME_OF_DIRECTORY in the above command with the name of the directory which you want to navigate into. A sample is shown below.
As you can see, the current directory changes as soon as we enter the subdirectory.

Now that we are in the directory, how do we go out? Well, you can again use an option along with cd to step out of the subdirectory and into the parent directory. In my example, I am in ~/iOSProjects/100DaysOfSwift to go back to ~/iOSProjects I will use the following command.
cd ..
This will bring me 1 level up. Now I am in the ~/iOSProjects directory, as seen below.
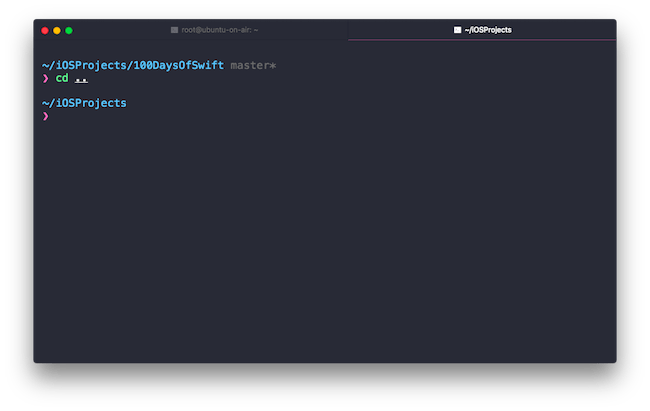
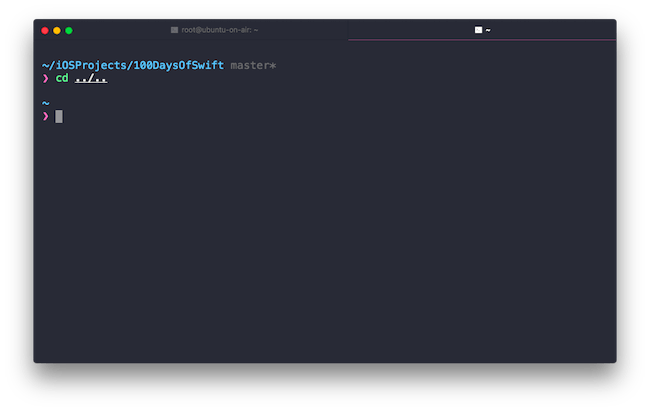
If I wanted to go from ~/iOSProjects/100DaysOfSwift all the way up to the root that is ~ , the cd command would be structured as follows.
cd ../..
The levels of nesting of directories will determine the number of ../.. in your options.
3. Creating and removing folders/directories
Another simple task we perform regularly is creating and deleting folders. This can be done using the following two commands.
- mkdir – The mkdir command stands for Make Directory and it’s fairly simple to use. Just type it as follows.
mkdir NAME_OF_DIRECTORY
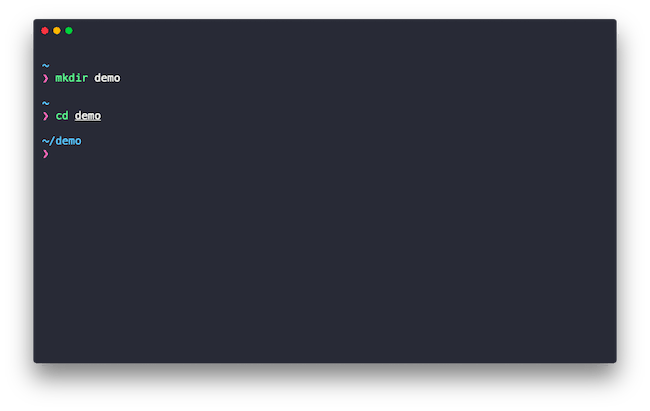
Replace the NAME_OF_DIRECTORY with the name you want to give your new directory. Once done, you can successfully navigate into it as shown below.
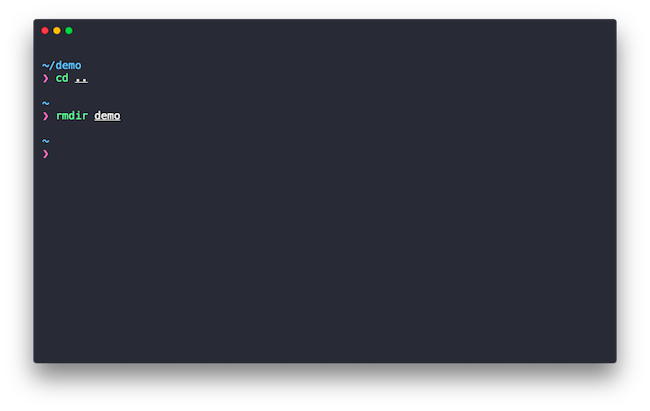
- rmdir – The rmdir command stands for Remove Directory and it’s used to remove directories/delete directories. To delete a directory you need to be locate outside it / located a level above it . Once you are out of the directory and that directory is empty, just type the command as follows.
rmdir NAME_OF_DIRECTORY
Replace the NAME_OF_DIRECTORY with the name of the directory you would like to delete. Remember that this command will only work if the directory to be deleted is empty.
4. Creating and removing files
Next up let’s learn about creating files. Since we are solely focusing on the terminal here and no other applications, you may be wondering how would you go about creating files of different formats (txt, docx, etc) right? well, this where our next command would come in the picture.
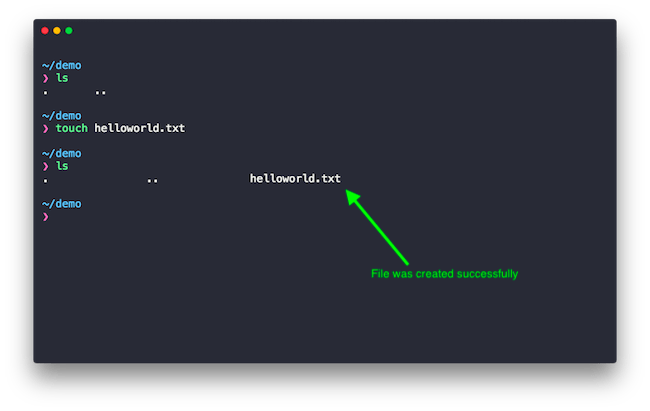
- touch – While the official purpose of using touch is to change file access and file modification times, it can also be used to create a new file. It is used as follows.
touch FILENAME.EXTENSION
Replace the FILENAME and EXTENSION with the ones you want. An example of usage is shown below. If your terminal executes the command without a message most likely the command was successful and you can check that the file was created using the ls command.
Now that we know how to create files, might as well learn how to delete them right? The next command will help you do just that.
- rm – The rm command stands for Remove, and it does what the name suggests, it is used to delete files and directories. It’s used as follows.
rm FILENAME.EXTENSION
Replace the FILENAME and EXTENSION with the ones you want.
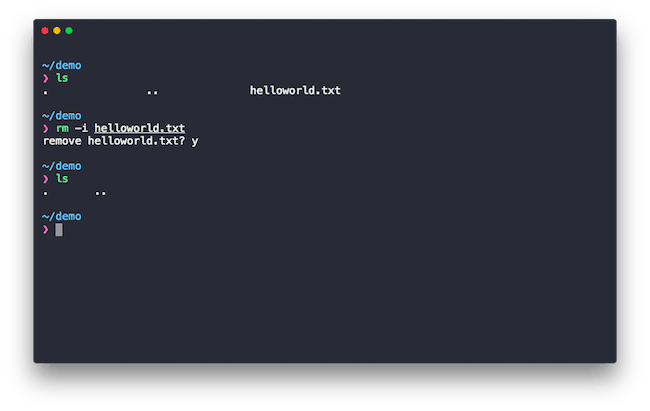
NOTE: The rm command is irreversible, so always make sure you are deleting the right files. A safer way of doing it would be using the rm command along with the -i option; doing so, the terminal will ask you to confirm if you want to delete the file or not. It is used as follows.
rm -i FILENAME.EXTENSION
We created a file, and we deleted it as well, but what about editing files? How to add and remove data? Well, as excited you are about those aspects, trust me when I say it, it’s a little too complicated and smooth to get overwhelmed if you are starting. We are doing the minimal ones here, and as we progress with every week, stuff like editing files from the terminal to the posts. Meanwhile, let’s move along.
5. Finding help
Alright! So, we did a bunch of things on the terminal. What if you forgot what the options to be used with a command or what a command does? Sure, you can Google it, but there’s a better way where you don’t even have to leave the terminal.
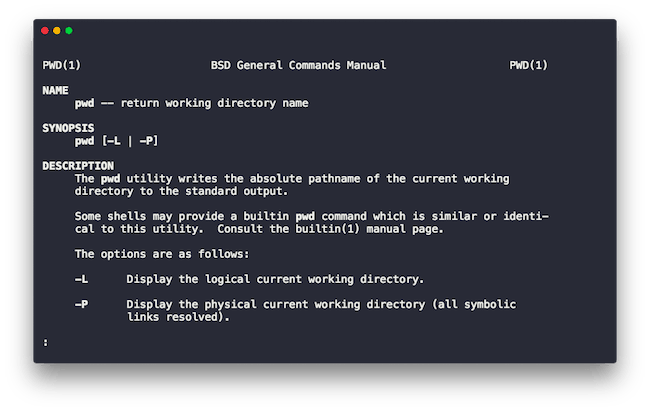
Linux has a command called man, which stands for Manual Pages. It is used to retrieve documentation about a particular command if you are unsure about a command, man it as follows.
man COMMAND_NAME
Replace the COMMAND_NAME field with the name of the actual command, and helpful documentation will be presented. You can use the spacebar to scroll and to quit the man page press q. The sample usage is shown below.

Conclusion
Alright, folks, this has been a long one, but I hope you grasped the basics reasonably well. Now that you have a working Linux installation and a week’s worth of time to make sure you play around with the commands I mentioned above. Don’t be afraid to screw up the Linux installation, and you can always go back and re-install it if needed. Explore to your heart’s content, and I will be back next week with Part 2 of this series, where we build on top of the Linux basics we covered in this post.


George
A small side note. You don’t necessarily need a decent computer to use Linux. There are lightweight Linux distributions like Lubuntu, which are meant to be used on low end computers. Lubuntu even managed to run flawlessly on my old Pentium 4 machine with 1 gig of RAM.
Prateek Phoenix
I agree but I mentioned the requirements keeping in mind that this is not a native installation. It will be installed on a Hypervisor which in turn has some requirements. Hope that clears it up :)
George
Oh yeah that’s true. VMs need more powerful machines to work efficiently. I was referring to native installations. My bad for not mentioning that.
Jay
I want to take this course to better understand Linux. However, I am running Linux Mint 17.3 rosa and could not find an appropriate VirtualBox download. Any suggestions?
Rajesh Namase
If you’re already on Linux Mint then you don’t need to install VirtualBox, follow the tutorial and learn Linux commands :)
Jay
Thank you. I will do.
Donna Harris
Can I load Linux on a laptop that now has a corrupted windows program that only restarts, wont do a reset, and has no identifiable windows installation using /scanos. ok so probably dumb questions but since pc wont work now, can I fix it with Linux?