Windows bootloader problem is one problem that every one of us has faced once till now. Knowing how to repair this problem is not very hard and even does not require any additional skills. In this guide, we will tell you how to repair the Windows bootloader problem.
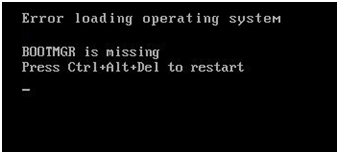
Although it is a rare situation, you may have seen something similar to the image below on your laptop screen or may see it in the future. This means that your Windows PC is displaying an error message on your screen before it even begins to load Windows. It is likely that the boot sector on your system partition is corrupted, damaged, or has missing files. In such cases, the master boot record needs to be repaired to get things up and to run again. Read on to know how to troubleshoot these problems.
How the Windows System Boots
When you press the power button of your PC on, the Basic Input Output System or Unified Extensible Firmware Interface reads data from the bootloader and then determines which partition to load. In older Windows systems, the bootloader is referred to as the Master Boot Record (MBR). In Windows 10, the bootloader is referred to as a GUID Partition Table (GPT), although users can still use the older MBR. So, depending on how advanced your system is, you might have either a BIOS or UEFI, which facilitates the loading of your bootloader.
You will experience an unbootable system if either the MBR/GPT or core operating system drivers become ruined. You can distinguish between the two cases by observing the initial symptoms experienced by your PC while it boots. If you get a blue screen (BSOD), that probably means the MBR or GPT successfully loaded, and it failed to complete boot-up. If you arrive some other condition, like a blinking cursor amid the blackness of a DOS prompt, then the MBR/GPT might be damaged, causing the bootloader process to fail. This happens after you see the BIOS information, but before Windows begins to load. Your screen may display one of the following errors:
- Bootmgr is missing
- FATAL: No bootable medium found! System halted.
- Error loading operating system
- Missing operating system
- Invalid partition table
- Reboot and select proper boot device
If you get any of these messages on your screen, you will not be able to start Windows and will have to use the Windows Recovery Environment to do your troubleshooting. We will now discuss how to use this mode and fix booting issues.
How to use Recovery Partition or Windows Installation Media
You start by switching your PC onto the Windows Recovery Environment. It is now that the recovery partition of your PC comes into the picture, allowing you to start the Windows Recovery Environment without needing a physical disc. How this is done will vary depending on the brand of your PC, but generally, there will be a message on your screen during startup telling you what key to press to start recovery and repair. In case your PC does not have a recovery partition, or you do not know how to access it, you can also start your PC using a USB or DVD with the Windows installer on it.
If you do not have an installation disc, you will have to use another system to get a copy of Windows and use it to create a DVD or USB installation disc, which can be used to boot your PC. When using a USB drive, set up your BIOS to boot from the USB drive. If your PC is still operational, then as a precaution, you must create a recovery drive or system repair disc for future use.
After booting into setup, choose the Repair Your Computer option > Troubleshoot > Advanced Options. If you are using a recovery drive, click Troubleshoot > Advanced Options. Either way, you will end up with the same options.
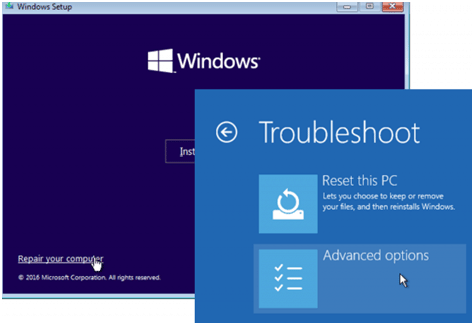
The Advanced Options page will appear next, and it contains the options that we will walk you through in the sections ahead.

Using Startup Repair
The first step is to try booting into the recovery environment, if possible, and then performing a startup repair. You need to turn your computer on and off three times to access the recovery environment. You must ensure that while booting, you turn off the computer when you see the Windows logo. After the third time, Windows will boot into diagnostics mode. When the recovery screen appears, click “Advanced Options.”
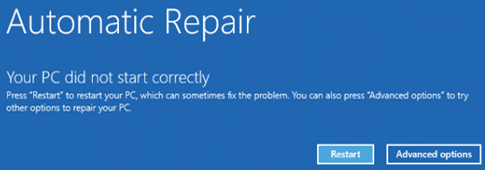
It is an excellent practice to let Windows try to automatically repair startup in the majority of the cases. This method not only attempts to fix the Master Boot Record or recreate the boot sector, but it also scans for and tries to fix other usual startup issues as well. On the Advanced Options page, click “Startup Repair.”
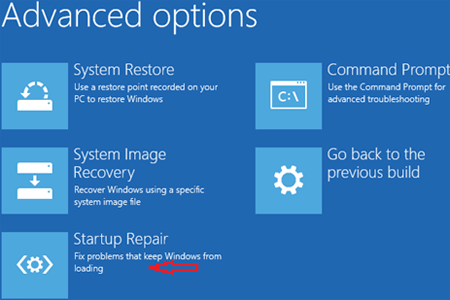
On the next page, click the operating system you want to repair. Windows will begin looking for startup problems and attempting repairs. Your screen will look like the image shown below.
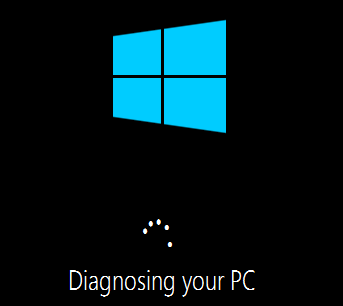
Windows will inform you whether the repairs were successful when the process ends. Irrespective of whether the repair is successful or not, you will be given the option to restart your PC or return to the Advanced Options page.
If the “Startup Repair” option fails, you can try repairing the Master Boot Record or rebuilding the boot sector manually from the Command Prompt. It probably might not work if the automatic repair did not since these commands are executed as part of the automatic repair process, but giving it a shot nevertheless might come to your rescue.
Using the Command Prompt to Fix the Master Boot Record
If you would like fixing issues manually or automatic repair failed, you can use the Command Prompt to attempt a quick fix. Click “Command Prompt” on the Advanced Options page.

Once you have the command prompt window on your screen, you will have to fire a set of commands to find and fix issues that might be stopping your system from booting.
Type BOOTREC /FIXMBR and hit <Enter>.
This command will attempt to fix any corruption issues with the master boot record. It will write a new Windows compatible Master Boot Record to the boot sector without overwriting the existing partition table.
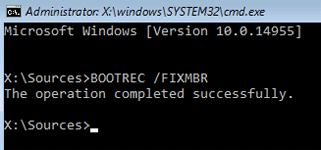
Next, type BOOTREC /FIXBOOT then hit <Enter>.
This command will attempt to write a new boot sector on the hard disk if Windows detects damage. This happens in cases where an older version of Windows or a non-compatible operating system such as Linux was installed. This command comes handy when there is a possibility that another operating system installation or malware may have overwritten your boot sector, or the boot sector itself is damaged.
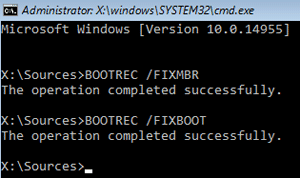
If you are getting an error such as Boot Manager is Missing, then the BOOTREC /RebuildBcd command may be able to resolve it. Using this command can also restore boot entries for older versions of Windows if you have a dual boot configuration.
If BOOTREC /RebuildBcd does not work, then Microsoft recommends you back up your BCD (Boot Configuration Data) store, then rerun the BOOTREC /RebuildBcd command.
Type each command (in the following order) and then hit <Enter>:
- bcdedit /export C:\BCD_Backup
- c:
- cd boot
- attrib bcd -s -h -r
- ren c:\boot\bcd bcd.old
- bootrec /RebuildBcd
In case you are dual booting with older versions of Windows such as Windows 7, use the BOOTREC /ScanOs command. The ScanOS command can find and restore entries for older versions of Windows.
Post Recovery Measures
Once you have repaired the booting problem successfully, it is suggested that you must take a couple of steps. First, use the Check Disk utility to scan your file system and hard disk. There is a chance that the physical problems with your hard drive were the root cause of your bootloader error.
Second, run the System File Checker utility to scan for and fix any corrupted system files. Although it is unlikely that executing any of the methods we have discussed will cause problems with system files, it is possible. So this needs to be checked.
Conclusion
No matter how rare the occurrence of the bootloader errors might be, they can still surface during high-risk operations, like reinstalling Windows, resizing partitions, or setting up a dual boot. They do seem intimidating when they pop up, but they can be repaired. You have to know what to look for and try the methods explained above to boot your system again.


George
A piece of warning for Linux lovers. If you want to install Ubuntu on an external HDD, do NOT go with the default installation method. It will install the Grub bootloader on your Windows drive which will render both your Windows and Linux installation unusable until you fix the problem in the ways that the above article describes.
Mahesh Dabade
Thanks for the information George.
Swapnil Narayan
Thanks for sharing the article for Repairing Windows Bootloader Problems if the Computer Won’t Start. Very informative content.
Mahesh Dabade
Thanks Swapnil :)
Thevika
Thanks for guiding me through it. It just helped me repair my windows.