Gmail is undoubtedly the best Email Service Provider and Email Inbox! We love to use it for our personal and professional purposes, and it would be the same for most of you. Apart from what Google has added in Gmail, there are some unknown features and third-party tips and tricks you can use. In one of our previous posts, we had covered the top Gmail Tricks to save your Time, by using inbuilt features and other services.
Now, however, we have something else to do with Gmail Inbox. In this article, we’ll share some simple yet effective Gmail Tips that will definitely save your time. Most of them are powered by Gmail’s inbuilt features but these features aren’t that known. So, shall we start them?
1. Enable and Setup Gmail Vacation Responder for Holidays
Managing your emails is a tough task when you are a busy person! And, you can imagine the worst situation when you’re going on a long holiday. You may be receiving a lot of emails and it is not courteous to leave them non-replied. But, it is a professional thing to let them know that you are on a vacation and to provide emergency contact information if you want to. This is what we can do using the Vacation Responder feature of Gmail Inbox. This works in both normal Gmail account and Google Apps accounts.

Basically, Gmail Vacation Responder is a message that you send to people. All the emails received at the particular time will be replied back with the Responder template you have created. The Gmail auto-reply may consist of text, phone number, and even your Digital Signature if you have one. You can create the content using WYSIWYG Editor of Gmail. Now, we will see how you can enable this Automated Response system in your Gmail Inbox.
How to Enable Gmail Vacation Responder?
The steps are simple on how to set up out of office in Gmail, just follow them.
- Go to Gmail Settings. You can do that by clicking on the Cog button on the right-top side and selecting ‘Settings’.
- In the General Settings tab, there’s a section named ‘Vacation Responder’.
- Now, click on the ‘Vacation responder on’ button to enable the automated response system.
Here, you can provide different information. You can define the active time for enabling the feature — First Day and Last Day. In the content part, you have to give data such as Subject and Message. You can also decide whether you want to send reply emails to those who are in your contact list. That is, a stranger won’t receive the automated response from Gmail. If you have included confidential information such as contact number, you ought to enable that button.
With these steps, you can set up Gmail out of office, in general, and Google Apps accounts. However, if you are interested, you can set up some additional actions as well. For instance, you can automatically forward some particular emails thanks to the powerful Gmail filters and labels. By the way, it does not matter what you do for email automation, but make sure that you disable all these when you return after vacation.
SEE ALSO: Gmail Shortcuts to Improve Productivity »
2. Create a New Folder in Gmail
Do you receive hundreds of important emails in your Gmail Inbox? When you are a busy professional, it’s quite natural. In spite of the fact that Gmail has five different categories — such as Social, Promotions, and Updates — all the individually-sent emails will be in ‘Inbox’ itself. And, it’s a good thing to create folders in Gmail to manage your emails well. In fact, there is no proper concept of Folders in Gmail, it’s about labels and categories. However, if you use them well, Gmail Labels are the best way to manage all the emails you get. You can assign different labels to a single email.
How to Create a New Folder in Gmail Inbox?
- You have to select the Email message that you need to add to the new folder.
- On top of the message, you can see a few buttons and icons. From them, choose the ‘Labels’ icon with the photo of a tag.
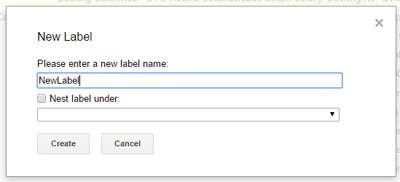
- There, you have a list of the existing Gmail Labels and the link to create one new. Click on the ‘Create New’ button to proceed further.
- Now, you have to provide the name of the Label. Also, if you like, you can add this label under another one.
- If Successful, you can see the Label name in the Email message info as well.
Now onwards, whenever you receive an email of a particular category, you can add these to labels. The best part of Gmail is that it learns your habits in the course of time. As we said, you can benefit from the Gmail Label feature in certain cases, such as when you have hundreds of emails to be answered. Thanks to labels, you can get them category by category.
SEE ALSO: Outlook vs Gmail: Find What Each of Them Has to Offer You »
3. Gmail Full Site Login on Mobile
Haven’t you accessed Gmail Inbox from your mobile web browser? Then, you know that Google has set up a clean, simple and effective interface for reading your mails and replying. We are not talking about the official Gmail App for Android and iOS, but the mobile site. Nevertheless, there are times when you have to load the full Gmail site in the mobile device. For instance, you may have to check out one feature that’s available only in the Desktop version. The full version may not be perfect in the mobile device screen, but you can do what you wanted.
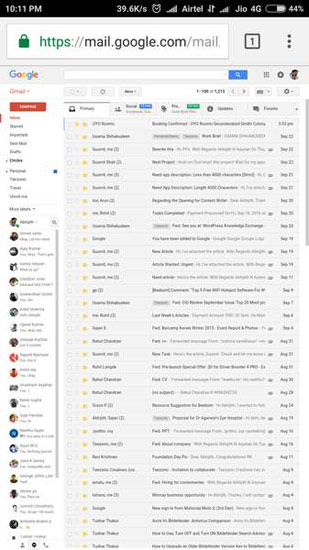
So, to get the desktop version of Gmail in mobile, you can follow these steps.
- Open Google Chrome browser on your Smartphone or tablet PC. if you don’t have that yet, you can download the browser from Play Store or App Store.
- Open a ‘New Incognito Mode’ from the Menu of the New Tab page.
- Once you are in the Incognito mode, load some random webpage.
- After the web page has finished loading, you have to tap on the three vertical dots for settings. From the list of the options, choose ‘Request Desktop Site.
- Now, you should be in the full Desktop version of the web page.
- Once that’s complete, you can enter www.mail.google.com to access the full Gmail Desktop interface instead of the Gmail mobile site.
As we said, this will help you when you need the full functionality of Gmail on your smartphone or tablet PC. The thing will be cool if you have a device with a bigger screen size.
There is an alternative to launch the desktop version of Gmail on your phone. First, you have to log into Gmail by loading the mobile version. After logging in, you can paste https://mail.google.com/mail/h/ in the address bar. This would lead you to the HTML version of Gmail, which is pretty basic but full screen.
SEE ALSO: Google Calendar Tips You Should Know About »
4. How to Send an Email to All Your Contacts in Gmail
Did you know how to send an email to all contacts in Gmail? Yeah, you heard that right. This is useful if you have an email dedicated to professional or personal needs. This way, you can send an important mail to all the people in an organization — without entering the names, one by one. Gmail has an in-built feature that allows you to send or forward an email message to all your contacts. You just have to follow these steps to get that done.
- Click on the ‘Compose’ button on the Gmail interface and a pop-up screen will be on the right-bottom part.
- In the first space, you can see a link named ‘To’. Click on that link, and you can see a pop-up on the screen.
- From the Pop-up, you can select the contacts to whom the email will be sent.
- Click on ‘Select All’ and hit the ‘Select’ button.
- Hit the ‘Send’ button and the email will be sent to all address in your contacts.
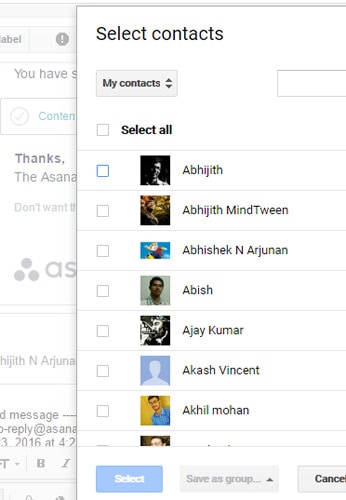
So, that’s your answer for your question on how to send an email to all contacts in Gmail. Don’t use this feature for spam, but this can be useful for massive sharing of important information such as company-wide announcements and all.
SEE ALSO: How to Add a Signature in Gmail Inbox »
5. Find Sender’s Location in Gmail
At times, you may have to find the sender’s location to have a better emailing conversation. Suppose you got a good offer from an unknown country and you have to reply in accordance with her/his location. As such, there is no way to find the location of a sender in Gmail. That having said you can try the two steps mentioned below to get an idea.
- Method 1: In some cases, though not necessary, Gmail includes the IP address of the Sender. This is applicable if the sender has made use of dedicated email clients like Outlook or Thunderbird for email management. In that case, you can find the IP address in the ‘More’ section of the received email message. As you know, the IP address can be used to find.
- Method 2: Given that the sender is from another country, there will be a difference in the Time Zone. You can understand the current Time Zone from the individual Gmail mail interface. By searching with the Time Zone, you can find the sender’s location of Gmail.
There’s no surety that these methods can work towards finding the location of the sender. However, you can give these two a try to get started.
SEE ALSO: How Do Gmail Spam Filter Works? »
6. Find the Person Behind an Email Address in Gmail
Email Address is indeed an effective way to track who is behind it. After all, an email ID seems to be the real digital address to be relied upon. Suppose you received an email from an address that is not in your contacts. What do you do when you want to find the person behind the email? Well, you can try searching it on Google. But the results may not be that good, especially if the person hasn’t used the email in public web spaces. And, that’s when we can make use of Reverse Email Lookup in Gmail. Following are the two methods you can use for reverse email search.
- Method 1: You can follow the steps we told in the previous tip to track the location. Depending on the IP address, you can get a clear idea about the person’s location as well. Once again, this is useful only if the sender uses a dedicated email client.
- Method 2: You can use Facebook to perform a reverse email search. The process is very simple. You have to paste the email address in the Search bar on Facebook. If there’s a Facebook account associated with the email ID, you can see the Profile instantly. It is perhaps the most effective one, given that almost everyone has a Facebook account nowadays.

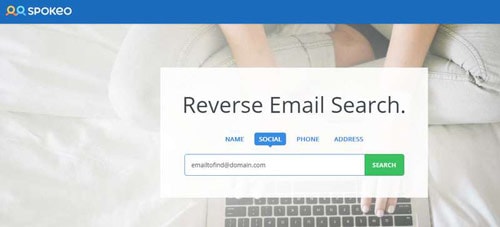
- Method 3: There are several People Search Services like Pipl and Spokeo. You can enter the email address in the search bar and get information about these in no time. If the two abovementioned methods don’t help you, you can do an extensive search via these people search engines.
- Method 4: You can also use Email Sherlock. Email Sherlock will help you with free reverse email lookup in Gmail, Yahoo, Hotmail or any other email service that has been shown up in your inbox. As the name indicates, Email Sherlock will help you find if the email id is from a validated person.
Conclusion – Simple Yet Effective Gmail Tips
So, these are the simple yet effective Gmail Tips that we told you about in the intro. It is undoubted that the Gmail Vacation Responder and Label Creation are useful for almost all Gmail users. Even when you are using it for personal needs, it’s an awesome thing to manage your email messages properly. By the way, do you have any other noteworthy Gmail Tips that will be useful for common users? We are excited to hear from you.


Omkar Patel
I simply wanted to write down a quick word to say thanks to you for those wonderful tips and hints you are showing on this site.
Mahesh Dabade
Pleasure Omkar.
Pablo
I simply wanted to write down a quick word to say thanks to you for those wonderful tips and hints you are showing on this site.
Mahesh Dabade
Thank you Pablo, that is so kind of you.
Sajid
I loved the reverse whois email search. Had never heard of it.
Mohet Gomes
Sending an email to all contacts is really so easy but never click on that, I used to copy and paste all my contacts which I copied earlier to a separate notepad file. Selecting all contacts by clicking on to option is really good to know.
Mahesh Dabade
Yes Mohet, it is a very cool tip :)
Patel Vaishali
Oh! I didn’t know such cool features of Gmail. Thank you for the sharing.
Mahesh Dabade
Hi Vaishali, glad you liked them.
Vijay
Awesome I didn’t knows that Gmail has such features too along with it’s simple layout. (I am using gmail in HTML Mode). Thanks.
– Vijay Singh.
Subhadip
I didn’t know that Gmail can find sender’s location. Awesome. Sometimes I wonder if it could be used as an auto responding service.
Nawesabi
I may never have known that Gmail has this much features. Thanks for the eye opener. My friends should know about this, so it’s worth giving a share.
Mahesh Dabade
Hi Nawesabi, glad you liked the post. Keep visiting and let us know what you think.
Dustin Ford
Great tips! I liked how you described how you can find who’s behind the email address. I little bit of stalker-ish but useful sometimes.
Mahesh Dabade
Thank Dustin :)
Meloney
Thanks Abhijith for such informative write-up. I have been using Gmail for over 10 years and I can tell that it has more pretty good features than you listed. Although I learned something new from you post. Good work!
Mahesh Dabade
Hi Meloney, here are some articles related to Gmail. Hope you like them.
1. https://techlila.com/collaboration-tool-gmail/
2. https://techlila.com/gmail-shortcuts/
3. https://techlila.com/gmail-tricks/
Let us know.
Cristina Silva
Really, such greats feature of Gmail. Thanx for posting this article.
Sujata
The title of the post is very apt for this post. Really simple but vet very effective tips. Some of the things like creating a folder and viewing Gmail regular site in mobile were known to me. But most of the things are very helpful for me.
Mahesh Dabade
Hi Sujata. Glad you liked the article.
Gagan
Nice article bro. My contacts from Gmail are deleted. Can u tell me any easy method to restore them back bro?
Help will be appreciated.
Mahesh Dabade
Export your contacts in an xls format and go to accounts.google.com and import that xls file.
Brandon Cox
Abhijith, awesome tips! I love having the ability to nest subfolders/sublabels. Helps me stay organized!
Prudhvi
Hey thank you for sharing an interesting information. I think that Gmail is only for sending mails. But after reading this I came to know many unknown features. Thank you for sharing.