With Windows 10, Microsoft introduced a memory compression technique to manage the memory in an efficient manner. So, to put that in action, a process named system and compressed memory came into existence (some even call it as Windows 10 system and compressed memory process just because it’s only associated with Windows 10). However, you may only observe the system and compressed memory disk usage in the earlier builds of Windows 10. If you have the latest build of Windows 10 installed, then the system and compressed memory is simply “System” as observed in the task manager.
Even though the process has been renamed, it still does the same job. And, it isn’t a bug – it’s an essential process. However, in some cases, the process tends to take up a lot of memory which in turn slows down the system. So, in this article, we will discuss what is system and compressed memory and how to fix the 100% disk usage problem caused by it.
Table of Contents
- 1. What Is System and Compressed Memory?
- 2. 100% System and Compressed Memory Disk Usage
- 3. Solution #1: Disable Superfetch
- 4. Solution #2: Set Page File Size to Automatic
- 5. Solution #3: Disable System and Compressed Memory Process
- 6. Solution #4: Turn Off Visual Effects
- 7. Solution #5: Hardware Failures
- 7.1. Hard Disk Issue
- 7.2 RAM Failure
What is System and Compressed Memory?
System and compressed memory – now simply renamed to “System” is a process which introduces a memory compression technique which helps the OS to retain more applications and data in the physical memory (RAM) without the need of reading/writing to the disk frequently.
The official Windows blog explains that as follows:
In Windows 10, we have added a new concept in the Memory Manager called a compression store, which is an in-memory collection of compressed pages. This means that when Memory Manager feels memory pressure, it will compress unused pages instead of writing them to disk. This reduces the amount of memory used per process, allowing Windows 10 to maintain more applications in physical memory at a time.
So, except the 100% disk usage error, if you observe the “System” or System and compressed memory process to take up more memory than expected, it’s completely normal. If it does not affect the performance of your system, it’s actually working efficiently because if you have more RAM free – what good is it for? So, the more the memory utilized, the faster the performance.
100% System and Compressed Memory Disk Usage: Explained
Well, the process should technically reduce the frequency of disk read/write operations by compressing the unused pages. However, it might conflict with an application to abnormally increase the disk usage to 100% and thereby making the system unresponsive – this is exactly the case of system and compressed memory high usage that you might have seen in some forums or social networks which people go on asking around. Also, high Memory usage by ntoskrnl.exe process could be another issue which can be resolved using the methods mentioned below.
In some cases, if you have tweaked the page file size for all the drives in Windows 10, then the system and compressed memory process might result in a high disk usage. So, considering the facts discussed above, let us now take a look at the possible solutions.
Solution 1: Disable Superfetch
Superfetch is a built-in feature to preload the program and data for a faster access time. It is one of the best solutions to fix high disk usage on Windows 10. To disable the superfetch service, follow the steps below:
- Press Windows key + R to launch the Run dialogue box.
- Upon launch, type in “services.msc“.

- Now, you can observe all the services listed. You will have to scroll down to find a service named “Superfetch“.

- Right-click on the service, and then click on “Properties“.

- In the startup type as shown in the image below, set it to “Disabled” i.e when the computer boots up next time, the superfetch service won’t launch unless you manually start it.

- Now, click on “Apply” and, then click “OK“.
After you are done with these steps, restart your computer and check if the high disk usage issue on Windows 10 still persists. If the problem still exists, try the next solution.
Solution 2: Set Page File Size to Automatic (If You’ve Changed It)
If your system was ever low on virtual memory, you might have tried to change the page file size to cope up with the issue. However, that might be a potential cause for the system and compressed memory high usage as well, why not try reverting back to its default state?
Follow the steps below to set the page file size to automatic:
- Press Windows key + S to open up the search bar.
- Now, type in “Performance“. You will now observe an option “Adjust the appearance and performance of Windows“.

- Head to the “Advanced” tab in the next window. Finally, under the – Virtual Memory section, click on “Change“.
- If you notice the first option as unchecked, just enable it and click “OK“.
Solution 3: Disable System and Compressed Memory Process
This solution is not recommended because it might affect the performance of your system. But you can still try it if nothing else works. So let us look at the steps that you should follow:
- Press the Windows key + S to open up the search bar and then type in “Task Scheduler“.

- From the left portion of the window, navigate your way through – Task Scheduler (Library) > Microsoft > Windows > MemoryDiagnostic.

- Now, if you click on MemoryDiagnostic, you will have two tasks listed to the right. Among the tasks mentioned, right-click on RunFullMemoryDiagnosticEntry and then disable it.

- Finally, restart your computer to check if the issue still persists.
Solution 4: Turn Off Visual Effects
Well, this may not be the solution you were looking for, but it did solve the high disk usage issue on Windows 10 for some users. So, here’s what you need to do:
- Press Windows key + S and type in “Performance“.
- From the options, click on “Adjust appearance and performance of Windows“.

- Now, on the first tab of the Window, you just need to click on “Adjust for best performance” and Windows will automatically scrap down the unnecessary visual effects.

Solution 5: Hardware Failures
If none of the above solutions work for you, then “system and compressed memory” process may not be the culprit for the high disk usage problem on Windows 10. You might have a hardware issue.
Two possible issues are:
- HDD/SDD Issue
- RAM failure
Hard Disk Issue
To check for errors on your HDD/SSD, you just need to head to the desired partition (Windows partition) and then follow the steps below:
- Right-click on the Windows drive (usually C:)
- Click on “Properties.”
- Now, head to the “Tools” tab and then under “Error Checking” click on “Check“.

- Do note that you will need Administrator rights in order to check for errors if you’re using a shared computer. Once the scan is complete, fix the errors (if any) – else move on to the next solution.
You also follow our guide to reclaim storage space on your HDD/SDD while deleting the residual files – this might help as well.
RAM Failure
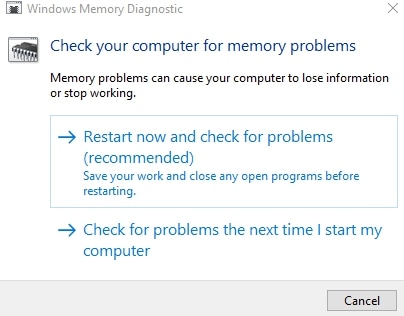
A faulty RAM stick can also be the root of this issue. So, you can try using the “Windows Memory Diagnostic” tool to check for memory problems. Just press Windows key + S and type in “Memory” in the search bar and you should find the tool listed.

When you click on that, it will simply ask you to restart the system to check for errors. Click on it to restart the system to check for RAM issues.
If it’s time to upgrade/replace your RAM stick (and you know it), then it’s better to replace the old RAM sticks. If you have a desktop, you can try replacing the RAM stick with a new one (one by one – if you have multiple sticks). After replacing the RAM stick, check if the issue still persists. In either case, if you have a laptop/notebook, you need to take the help of a professional (service center) to check if there’s an issue with the RAM.
Wrapping Up
Hope that helps you with the issue of high disk usage on Windows 10. If none of the above solutions work, you might need to re-install the OS and follow the computer maintenance checklist to avoid errors/issues on your PC.
Having trouble following the solutions mentioned? Let us know your thoughts about the system and compressed memory process in the comments below.


Danya
Thanks for this post, This article is very helpful to increase our hard disk space and
most work properly.