CompatTelRunner.exe is currently the most talked about extension around the world among Windows users. This is because many Windows users have reported that they are seeing an unknown extension named Compattelrunner.exe running inside their task manager. Moreover, it is interesting to note that this extension is using even more Disk and CPU than Google Chrome which is known to use the most amount of CPU and Memory. Now, we should let you know that this is not a malware or Trojan that many of the Windows users believe it to be. Rather, it is an extension that has been bundled by Microsoft inside of Windows.
What is CompatTelRunner.exe?
CompatTelRunner.exe is a Windows extension that was introduced in Windows by Microsoft itself. This extension helps the users in order to upgrade to the latest version of Windows or Service Pack Upgrades as well. It also checks for issues in Windows related to compatibility and, if present, generates a report and sends it to Microsoft.
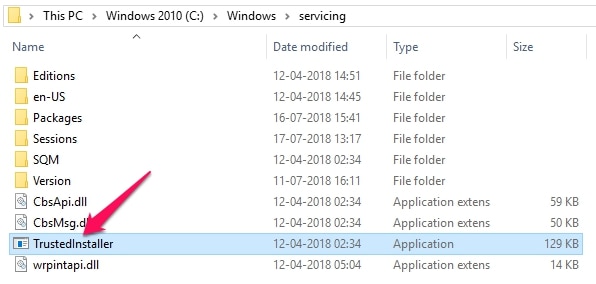
Now, many of the Windows users who like to opt for privacy instead of the latest features are known to have disabled the CompatTelRunner.exe extension. However, we should tell you that disabling this extension is not as straight-forward as is the case with other extensions. This is because Microsoft has bundled this extension so it comes signed by TrustedInstaller. Therefore, you do not have the right to modify this extension even if you are an admin and you will get an Access Denied error message.

However, CompattelRunner.exe high disk usage is a known issue and we have some solutions to disable or uninstall it. We have made a list of all the possible ways with which you can fix CompatTelRunner.exe disk usage problem below in Windows 10 and Windows 7.
1. Disable CompatTelRunner.exe from Task Scheduler
The first and the most basic way to stop compattelrunner.exe from high disk usage is to disable it from the Task Scheduler. For this –
- Open the Run manager in Windows by pressing Windows Key + R. Inside the Run menu, type taskschd.msc and hit Enter.

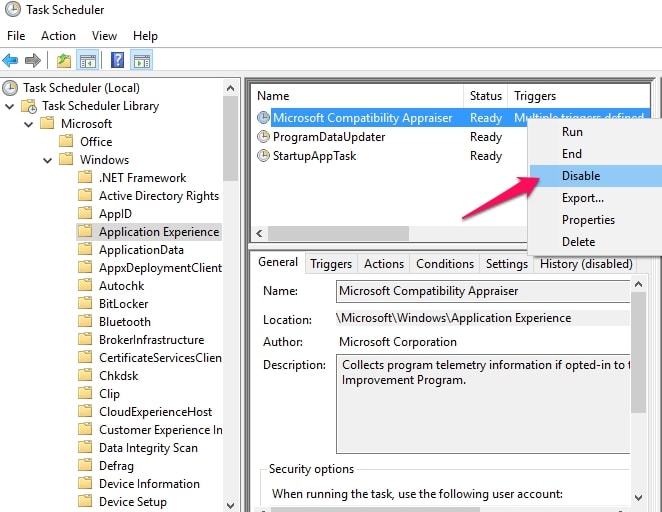
- Now, you will see that the Task Scheduler has been opened. In the Task Scheduler, you will see a Task Scheduler Library on the left side which you need to expand. After expansion, go to Microsoft and then click on Windows and finally click on Application Experience.

- Now, you will see a list of Applications next to this window. Here, you will see one application named Microsoft Compatibility Appraiser. Right-click on it and choose the Disable option from the list.

Once you disable the Microsoft Compatibility Appraiser or Compattelrunner.exe file, you will no longer get a high disk usage problem on your Windows PC again. However, this is a temporary solution and this might not work for you. Therefore, we have also added a solution below where you can directly delete it instead of disabling it. So, if the above solution doesn’t work then you can try the one mentioned below.
2. Transfer Ownership of CompatTelRunner.exe and then Delete it
This is the second and possibly the best method for removing compattelrunner.exe high disk usage error from your PC. In this method, we have to delete the CompatTelRunner.exe application entirely from our PCs.
However, we have already mentioned that this extension has been bundled by Microsoft itself. This means that you cannot delete the extension directly as it is owned by TrustedInstaller. Therefore, you have to transfer the ownership to the PC’s administrator, first of all. Make sure that you are logged in as an Administrator as it plays the most important part in this method. Once you have checked that, proceed with the method.
- Press the Windows Key on your keyboard to open the Windows Start menu.
- Type compattelrunner.exe and you should see a program named CompattelRunner.exe at the top of the list under the Programs section. Right-Click on CompatTelRunner and click on Open File Location.

- Once you click on Open File Location, you will see a new window opening where the CompatTelRunner program has been installed. This will be inside the System32 folder of your Windows installation.

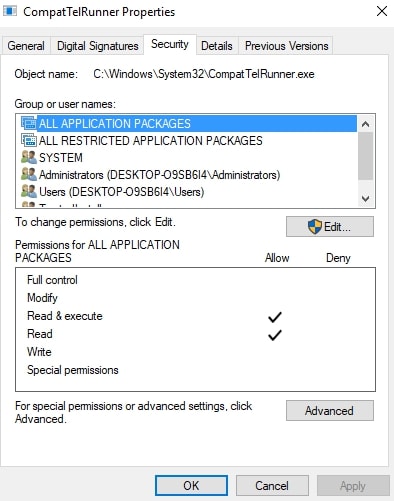
- Now, right-click on CompatTelRunner here as well and click on Properties to go to its Properties tab. In the Properties of CompatTelRunner, go to the Security tab. Here, you will notice that all the other users have Read and Execute access only whereas TrustedInstaller has access to every permission.

This needs to be changed as we want to delete the application from our PC which can only be done by TrustedInstaller right now. Therefore, we will now transfer the ownership of CompatTelRunner from TrustedInstaller to Administrator.
- For this, click on the Advanced button inside the Security tab. In the Advanced options window, you will see that the current owner is TrustedInstaller.

- Click on the Change button beside the owner name and type Administrators.

- Click on OK and the Administrator will now become the owner of CompatTelRunner. After this, click on Apply and you have successfully changed the ownership of this application.
- Now that the ownership has been changed, the remaining process is very simple. You have to close the advanced tab of Security and you will see the Properties window of our application. In the Security tab, you need to change the Permissions of Administrators to whom we just transferred the ownership.

- Click on Advanced once again and click on Change Permissions button below which will give you administrator access. Now, double-click on Administrators option from the list and give them Full control and press OK.
Now, we have changed the ownership of CompatTelRunner completely from TrustedInstaller to Administrator. Therefore, just right-click on the compattelrunner.exe application from the System32 folder and delete it. Although this is the best known-to-be-working method available to us, even this is known to not work on some users as per reports. Therefore, the final option is to entirely uninstall the KB2952664 update which is the root cause of the installation of CompatTelRunner application on our PCs. But, the problem is that Windows will automatically install this update once again so this is just a temporary solution.
3. Uninstall KB2952664 Update from Windows 7
If you have decided that nothing else works for you and you just want to uninstall the KB2952664 update, you can follow this method mentioned below to uninstall this update. Moreover, it is interesting to note that this update is a compatibility update for Windows 7. This was released by Microsoft to make sure that your Windows 7 PC runs on the latest version.
- Open the Command Prompt window by clicking on the Windows key + R button and type cmd. Before opening Command Prompt, right-click on it and select Run as Administrator option.
- Now, open Command Prompt as Administrator and type the following command to uninstall the KB2952664 Windows update.
dism /online /get-packages | findstr KB2952664

- Press Enter after typing the command and this will give you a list of the update’s version which is installed on your PC. Once you see the list of the version which is installed on your PC, type the following command.
dism /online /remove-packages /PackageName:Package_for_KB2952664~31bf3856ad364e35~amd64~~6.1.1.3

- Finally, verify that the update has been uninstalled entirely from your computer by typing the following command in the same Command Prompt Window.
Get-HotFix –id KB2952664
Funnily enough, you can be sure that everything is uninstalled properly if you get an error. On entering the above command in Command Prompt, you should get an error saying “cannot find HotFix” which means that it has been uninstalled successfully.
Now, as we mentioned earlier, this is not a permanent solution as the compattelrunner.exe will be installed once again as soon as Windows is updated. But, if you are facing severe compattelrunner.exe disk usage problems than this is highly recommended for the time being.
Also, it is quite possible that you are not running KB2952664 update of Windows 7 but you are still facing the compattelrunner.exe high disk usage problem. Therefore, you can also uninstall the versions KB2977759 or KB2976978 update of Windows 7 which are reported to have this issue as well. To uninstall these versions, you just need to replace your version number with the above-mentioned KB2952664 in the Command Prompt.
Conclusion
Compattelrunner.exe is not a Trojan or a Malware as we have already mentioned in the article above. However, it is a known issue that this extension sometimes takes up to 70% of disk and CPU usage which is a major concern. Also, there is an issue of privacy as the extension tracks whether there is an issue on Windows or not. Thus, if you are someone who has compattelrunner.exe high disk usage problem or you are someone who likes privacy then you can delete/uninstall/disable this extension without any worries from the methods mentioned above.


Leave a comment
Have something to say about this article? Add your comment and start the discussion.